 back |
 home |
 next |
After scanning in the inks the file should be separated into layers. The resolution should be a minimum of 300 DPI if you expect to print it, but 600 DPI is usually better. For the Internet you could go with 150 DPI for working with, and later shrink it to 72 DPI. We'll try to minimize size or scale changes for now.
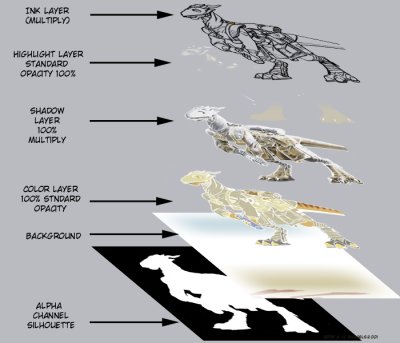
The following shows how the layers are organized in the file. Starting from the bottom, there is an "Alpha Channel," consisting of the silhouette of the character. This is used to select the areas of the upper layers, to delete the background.
Next comes the "Background" layer, which initially holds the image you have scanned. Two copies of this layer are made. The top one will be used to "multiply layer" and will be your final inks. The one below it will be a standard opacity. That layer will first be "thresholded," and the slider moved up to make the black lines a little thinner, but not anti-aliased, or smoothed into the background.
Using the Threshold command in Photoshop means you change a grayscale image to pure black and white. Threshold is an adjustable limit expressed as a range of numbers from 0 (black) to 255 (white), using a slider which gives feedback. The higher the number, the whiter the pixels, and accordingly the lower the number, the darker. It is generally set at 127, but in scanning is usually moved closer to 96.
Once the layer is prepared, the white areas are selected and deleted. To avoid any corrupting of the level, check the Preserve Transparency option.
Between the Background and the ink layers above it are three layers called "Color," "Shadow," and "Highlights." The Color layer is made by using Bucket fill to put white into a new layer. Then you use the Alpha Channel to select the character's silhouette and invert the selection. Once you've done that, delete the areas not in the character's silhouette.
This is a standard opacity layer, so Preserve Transparency should be left on. The Shadow layer is similarly created, but is a "multiply layer." The Highlight layer is simply a blank layer. The following image shows all the layers on a complete image. We will return to this image later.
The "Multiply" function is a Photoshop effect: when combined, layers placed one above the other will heavily tint and darken the layers below them. Picture the Multiply's upper layers as being like clear transparencies -- the darker the elements on each one, the more effect they have on the layers below. Black has the greatest effect, while white has none whatsoever. The "Screen" function has the opposite effect on subsequent layers -- the lighter the shade, the more impact on the layers below it, and black has no impact at all.
| this tutorial | ||||
 back |
 home |
 next |
||
| Tutorials | ||||
 back |
 Home Page |
 next |
||

